
How to connect TigerTrade to a cryptocurrency exchange
In this article, we will provide a detailed explanation of the methods for connecting the TigerTrade terminal to leading cryptocurrency exchanges. The connection process involves creating specific API keys.
Attention! This article is for informational purposes only and does not contain recommendations or calls to action.
The review has been prepared by the CScalp terminal team. You can get CScalp by leaving your e-mail in the form below.
TigerTrade terminal opportunity
The TigerTrade terminal presents traders with a promising opportunity to enhance their trading experience. With its robust features and intuitive interface, TigerTrade offers a range of benefits that can potentially improve trading outcomes.
One of the key advantages of the TigerTrade terminal is its powerful order execution capabilities. Traders can swiftly place market orders, limit orders, stop orders, and other types of orders with ease. The platform’s efficient order routing system ensures speedy and accurate execution, allowing traders to take advantage of favorable market conditions and seize profitable opportunities. Previously, we have already discussed about 5 best alternatives for TigerTrade terminal.
Additionally, TigerTrade provides access to real-time market data and in-depth analytics. Traders can monitor live quotes, track price movements, and analyze market trends using comprehensive charting tools. The platform offers a variety of technical indicators and drawing tools, empowering traders to perform thorough market analysis and make informed trading decisions.
TigerTrade also prioritizes risk management, offering features to help traders protect their capital. Traders can set stop-loss and take-profit levels for their trades, enabling them to define their risk-reward parameters. The platform provides real-time position monitoring, allowing traders to closely track their open positions and adjust their strategies accordingly. Read also how to configure TigerTrade terminal for trading.
How to connect TigerTrade to the Binance exchange
- Register on the Binance website if you haven’t done so already, and log into your account.
- Go to the API Management page in your Binance account. Before creating an API connection, enable two-factor authentication. Enter an API key name and click the Create button.
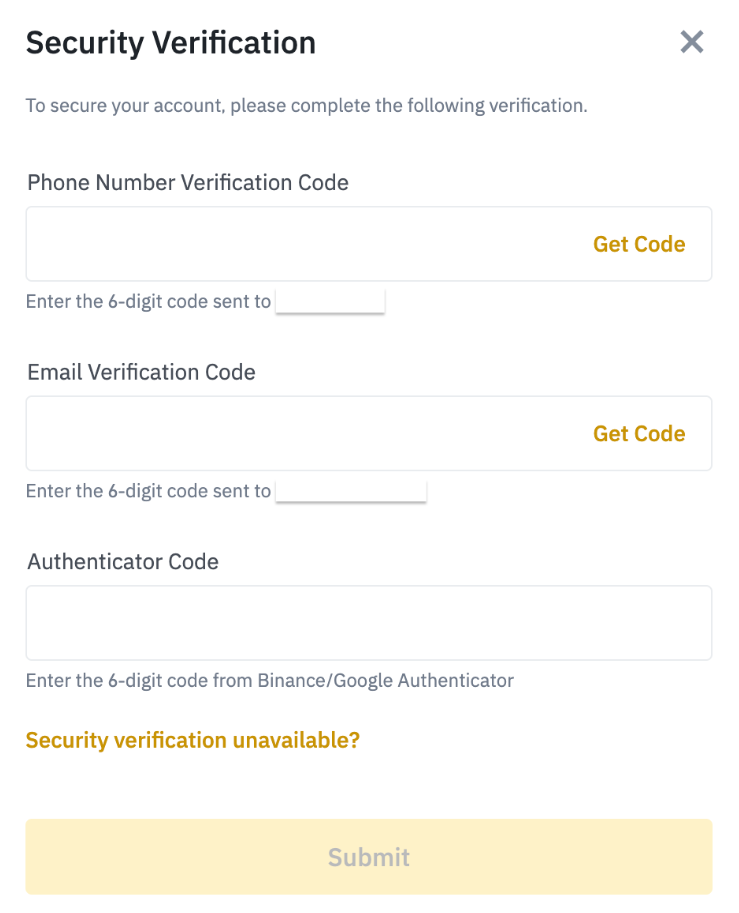
- Enter the required confirmation codes that you need to receive via phone, email, and Google Authenticator, and click the Submit button.
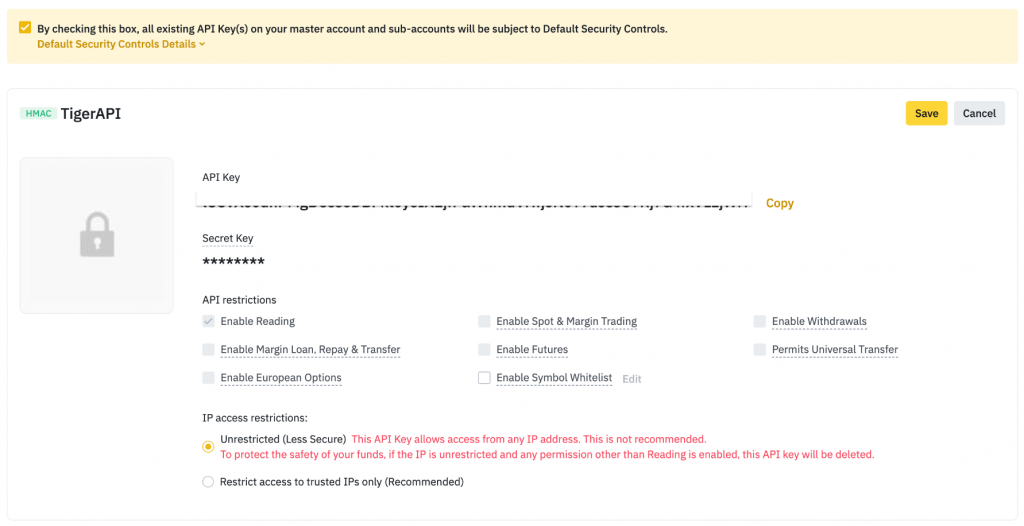
4. The API keys will be displayed on the page. Save them. Click the Edit Restrictions button.
5. Activate the options “Enable Spot & Margin Trading” and “Enable Futures” by checking the respective boxes. If you don’t see the “Enable Futures” option, it means your futures account has not been activated yet. To activate it, go to the Derivatives -> USDⓈ-M Futures section.
6. In the “IP Access Restriction” section, select the “Unrestricted” mode. If this mode is not available for selection, you need to disable “Default Security Settings” (as shown below) to activate it, after carefully reviewing Binance’s platform conditions.
7. Launch TigerTrade and from the main menu, select File -> Connections -> Configure.
8. In the opened window, click the Create New Connection button, and in the list that appears, select Binance.
9. In the opened window, select the account type (Spot – regular trading, Margin – margin trading, Futures – futures trading), and enter the API keys obtained from the Binance website. If your provider blocks access to the Binance website, enter the proxy server address in the format of ip:port.
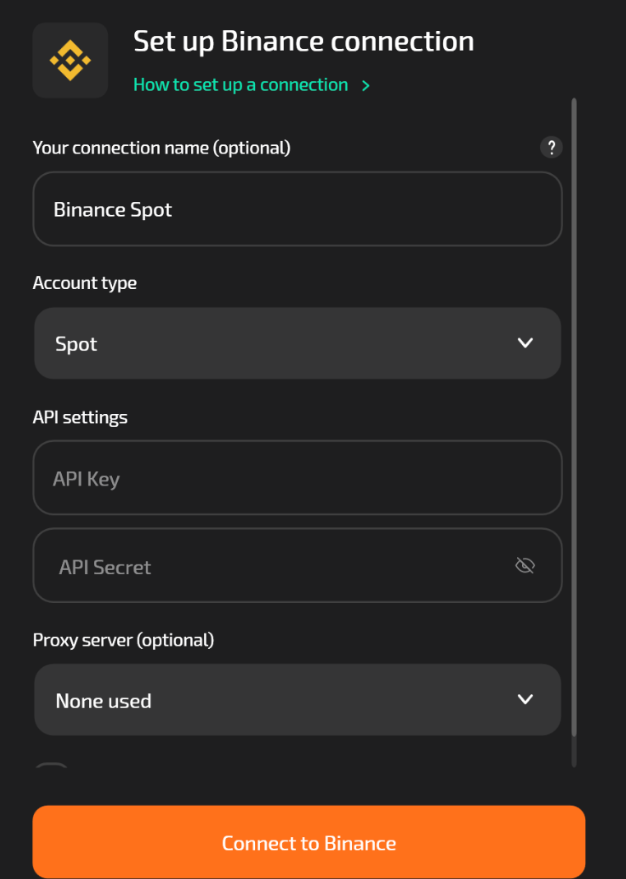
10. Click OK.
11. The connection configuration is complete. To establish the connection, from the main menu of TigerTrade, select File -> Connections -> Binance.
You can check the connection status (ping to the server) in the Log tab at the bottom of the main window. It displays the execution time of each user action (send, execute, cancel orders). The Binance server is not continuously pinged.
How to connect TigerTrade to the Bybit exchange
If you are using a regular (non-UTA) Bybit account, you need to create separate connections for each market type to access data for spot, perpetual, and inverse futures:
- For spot instruments, denoted in the terminal with a slash (e.g., BTC/USDT), select the Spot Live server.
- For futures instruments with the T suffix (e.g., BTCUSDT), select the USDT Live server.
- For futures instruments without the T suffix (e.g., BTCUSD), select the Live server.
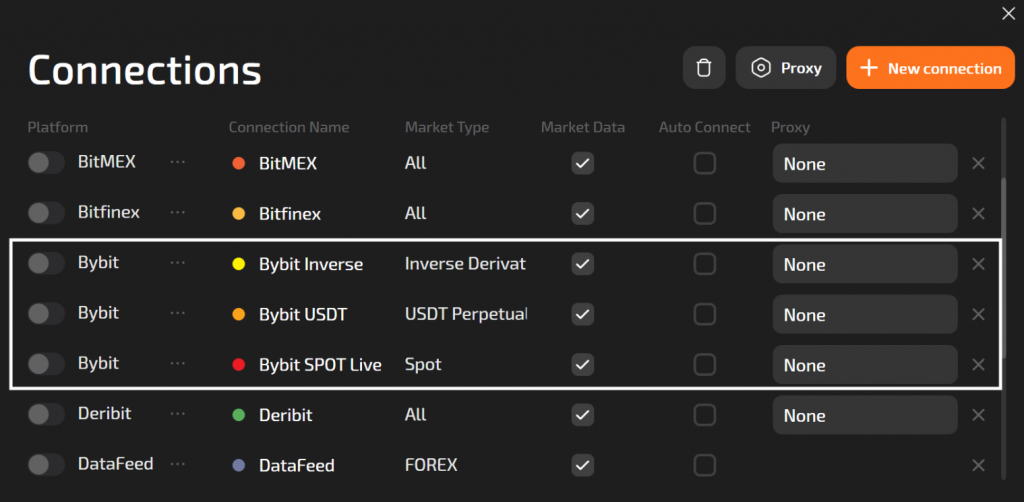
If you are using a Unified Trading Account (UTA) on Bybit, you only need to create one connection in TigerTrade to access data for all available instruments. Simply select the Unified Margin Live server from the server list.
Registration and API Key Creation
- Register on the Bybit website (if you haven’t already) and log in to your account.
- Enable Google Authentication for two-factor authorization. Then go to the API Settings page and click on Create New Key.
- Fill in the fields as shown in the screenshot below, then click the Send button and enter the code from Google Authenticator to complete the key creation.
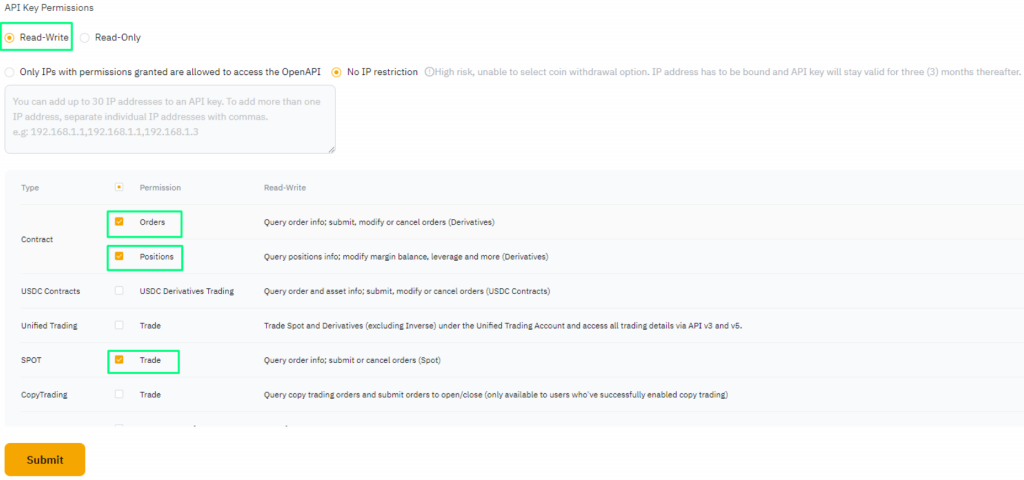
4. If you are using a Unified Trading Account (UTA), you also need to activate the “Unified Trading Account” permission in the key settings.
5. Save the displayed API keys. Launch TigerTrade and in the main menu, select File → Connections → Configure.
6. In the opened window, click the + Create New Connection button and choose Bybit from the list.

7. If you are using a Unified Trading Account (UTA), select Unified Margin Live from the server list. This will allow you to access data for all available instruments (perpetual and inverse futures, as well as spot).
8. Click OK.
9. Connection setup is complete. To establish the connection in the TigerTrade main menu, select File → Connections → Bybit.
How to connect TigerTrade to the OKX exchange
- Register on the OKX website (if you haven’t already) and log in to your account.
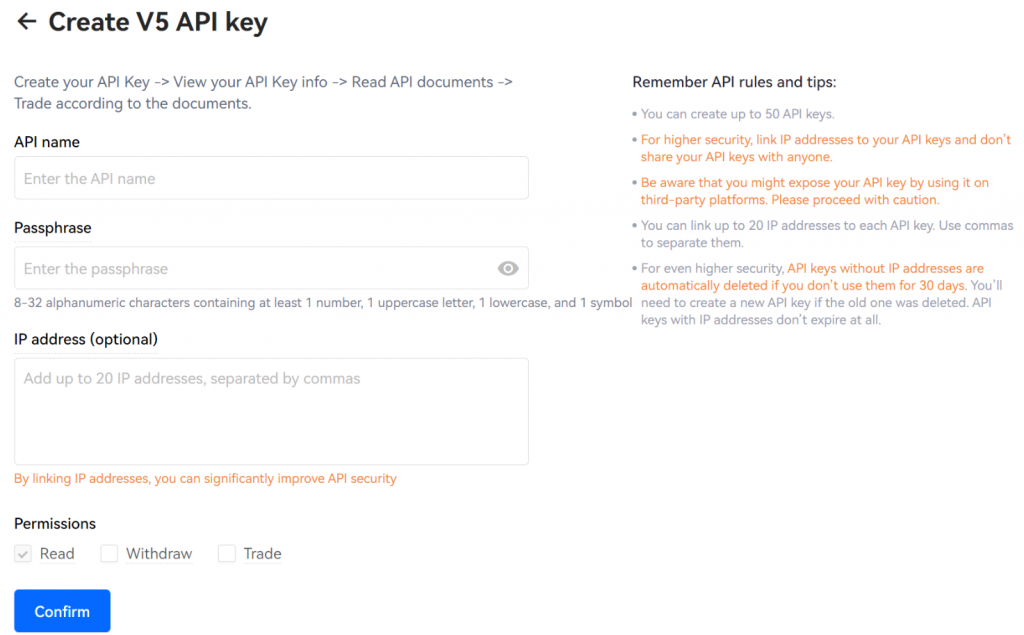
- Enable Google Authentication for two-factor authorization in the Security section. Then go to the API section and click on Create Key.
- Fill in the fields and check the boxes for withdrawal and trading. Click Confirm.
4. The API keys will be displayed on the page, save them.
5. Launch TigerTrade and in the main menu, select File → Connections → Configure.
6. In the opened window, click the + Create New Connection button and choose OKX from the list.
7. In the opened window, enter the API keys and passphrase obtained from the OKX website. Click OK.
8. Connection setup is complete. To establish the connection in the TigerTrade main menu, select File → Connections → OKX.
How to connect TigerTrade to the BitMEX exchange
- Register on the BitMEX website (if you haven’t already) and log in to your account.
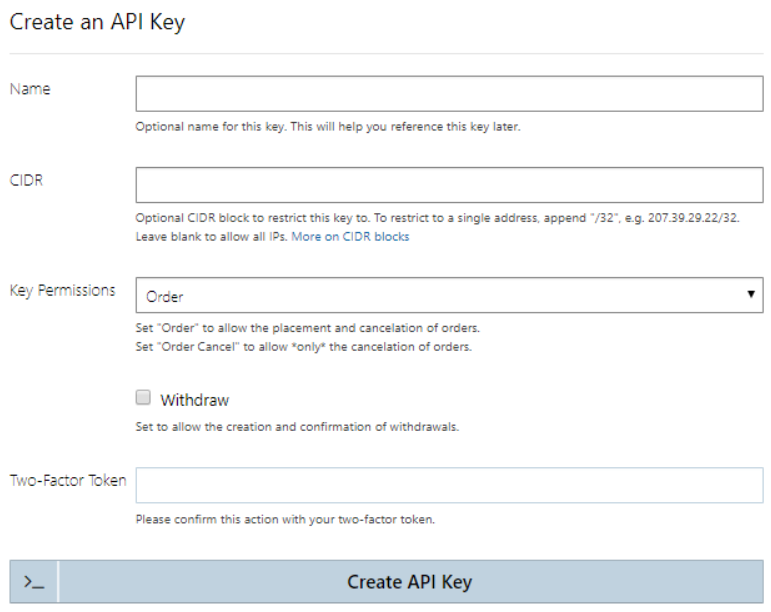
- Go to the Create API Key page. In the Basic Access Rights field, check the Order box, then click the Create API Key button.
3. After that, the created keys will be displayed on the same page. Save these keys as there will be no further opportunity to view them.
4. Launch TigerTrade and in the main menu, select File → Connections → Configure.
5. In the opened window, click the + Create New Connection button and choose BitMEX from the list.
6. In the opened window, select the Live or Test server and enter the API keys obtained from the BitMEX website. If your provider blocks access to the BitMEX website, enter the proxy server address in the format ip:port.
7. Click Connect to BitMEX.
8. Connection setup is complete. To establish the connection in the TigerTrade main menu, select File → Connections → BitMEX.
How to connect TigerTrade to the Bitfinex exchange
- Register on the Bitfinex website (if you haven’t already) and log in to your account.
- Enable two-factor authentication with Google Authentication. Then go to the API page and click Create Key.
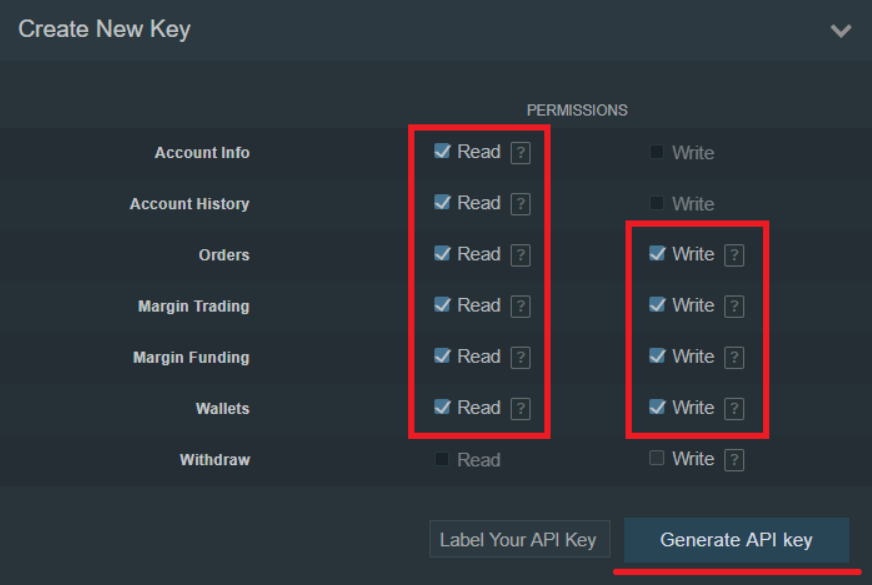
- Set the toggles as shown in the screenshot below and click the Generate API Key button.
4. Next, you will receive a confirmation email for key creation. In the email, click the CREATE API KEY button.
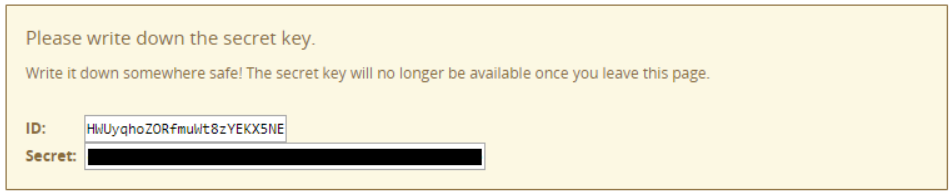
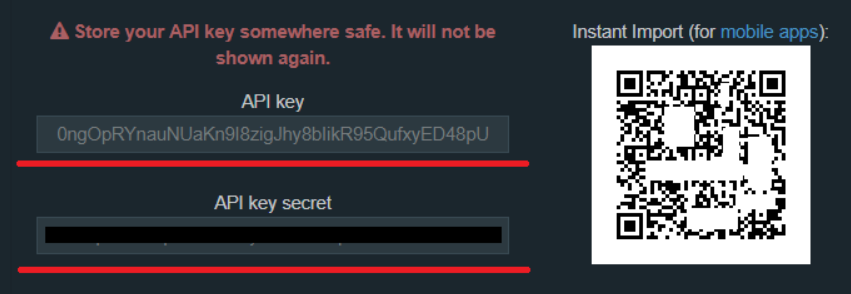
5. After that, the created keys will be displayed on the Bitfinex website. Save these keys as there will be no further opportunity to view them.
6. Launch TigerTrade and in the main menu, select File → Connections → Configure.
7. In the opened window, click the + Create New Connection button and choose Bitfinex from the list.
8. In the opened window, enter the API keys obtained from the Bitfinex website. If your provider blocks access to the Bitfinex website, enter the proxy server address in the format ip:port.
9. Click OK.
10. Connection setup is complete. To establish the connection in the TigerTrade main menu, select File → Connections → Bitfinex.
Join the CScalp Trading Community
Join our official trader's chat. Here you can communicate with other scalpers, find trading soulmates and discuss the market. We also have an exclusive chat for crypto traders!
Don't forget to subscribe to our official CScalp news channel, use trading signals and get to know our bot.
If you have any questions, just contact our platform's support via Telegram at @CScalp_support_bot. We will respond in a matter of seconds.
You can also visit our Discord channel and subscribe to the CScalp TV YouTube channel.
JOIN OUR CHAT