
Binance Futures API: Key Features and Best Practices
With its advanced features and user-friendly interface, Binance has become a go-to choice for many cryptocurrency traders. And exchange’s Binance API is a powerful tool for traders and developers alike, offering an easy way to integrate with the Binance platform. In this article, we will guide you through the process of configuring the Binance Futures API and reveal the best practices for using it effectively.
Attention! This article is for informational purposes only and does not contain recommendations or calls to action.
The review has been prepared by the CScalp terminal team. You can get CScalp by leaving your e-mail in the form below.
How to Set Up the Binance Futures API Connection?
To connect CScalp to Binance Futures API, you’ll need a Binance Futures account and CScalp installed on your PC. If you don’t already have an account on Binance, you’ll need to sign up to access the cryptocurrency exchange. Visit the Binance website and click on the “Register” button in the top right corner of the page. You can also use CScalp’s Binance referral code to gain discounts on trading fees.
Follow this step-by-step guide to set up the Binance Futures API:
Step 1: Create a Binance Futures Wallet
Log in to your account on the official website of the Binance exchange. Note that Binance and Binance Futures are two different platforms, however, they share a common site.
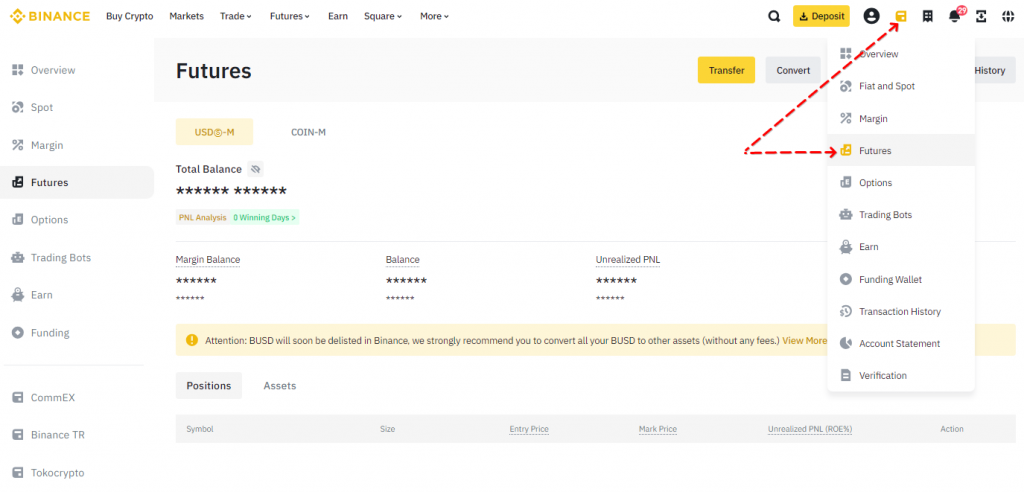
To create an account for futures trading, open the ‘’Wallet tab’’, then the ‘’Futures Wallet’’ tab.
In the pop-up window, determine the amount of leverage that you want to use. We suggest avoiding using leverage exceeding 5x when starting with Futures trading.
Then click on the “Open Futures Account” button.

Step 2: Generate the Binance Futures API Key and Secret Key
Log into Your Binance Account: To create the Binance Futures API Key, start by accessing your account on the Binance platform.
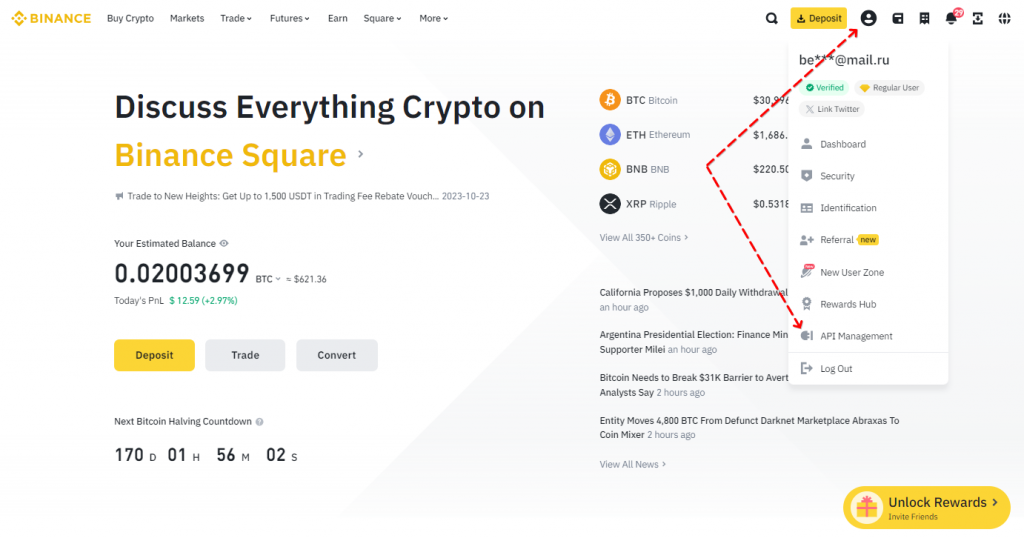
Navigate to the API Section: Once logged in, hover over your profile icon. From the dropdown menu, select “API Management.”
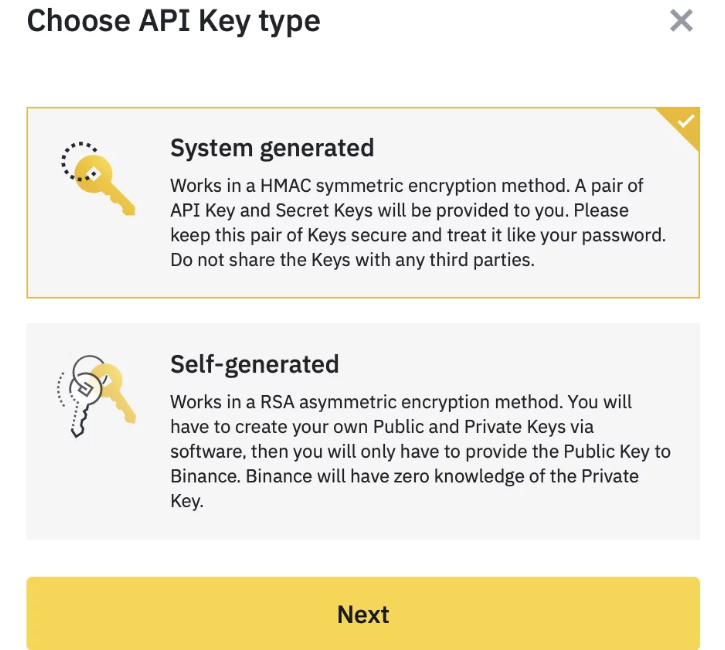
Choose Binance Futures API Key Type: Binance offers two types of keys – HMAC (standard API keys generated by Binance) and RSA (keys you create yourself). For most cases, HMAC keys will suffice. Select “System generated” and proceed.
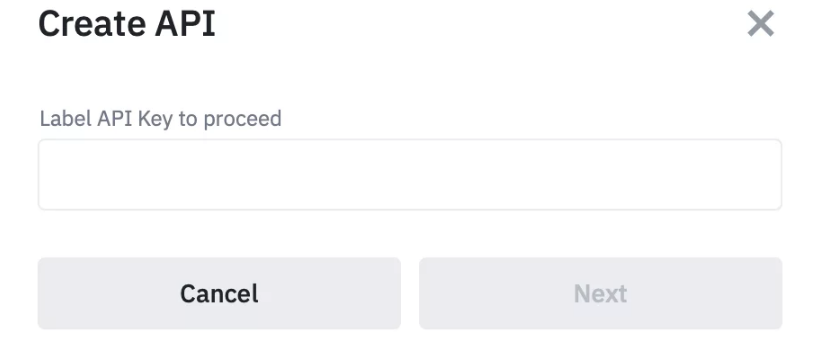
Label Your API Key: Assigning a label or name to your API key helps in easy identification, especially if you have multiple keys. In the field, input a descriptive label for your Binance Futures API key. For example, “CScalp.” Then click “Next.”
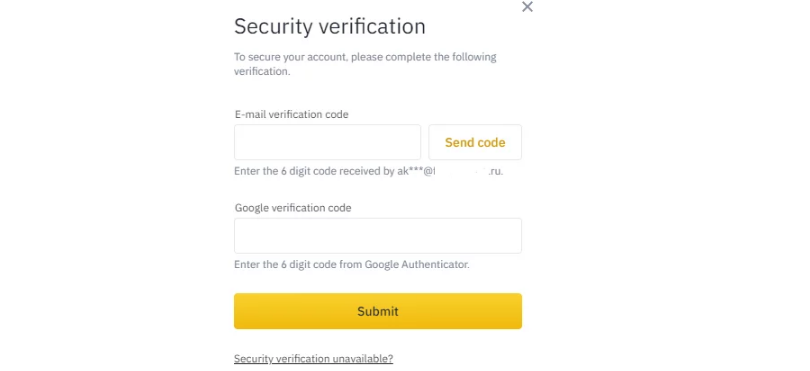
Verification Process: In the window that opens, click the “Send code” button. An SMS message with a code will be sent to the specified number. Enter the SMS confirmation code in the bottom field of the window. Do the same with the confirmation code from the email.
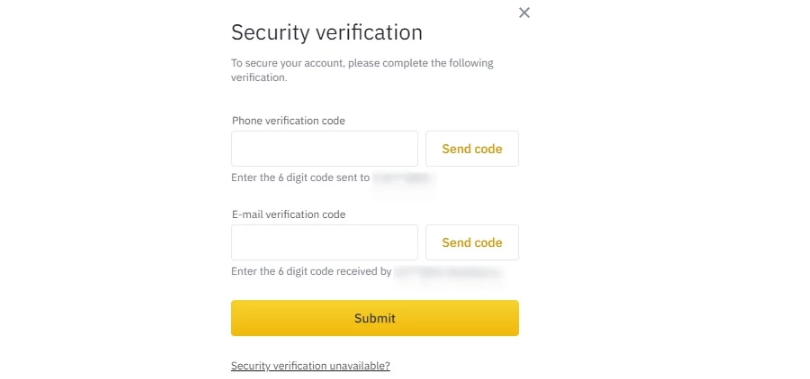
You can also use Google Authenticator or Passkey to confirm your identity.
Access Your Keys: After successful verification, your API Key and API Secret will appear. Store the Secret Key, as Binance won’t display it again for security reasons.
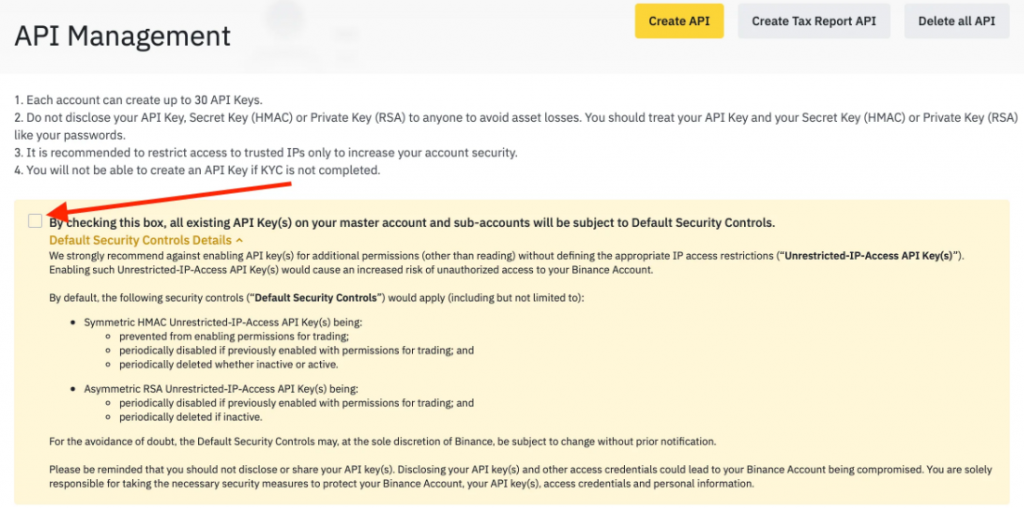
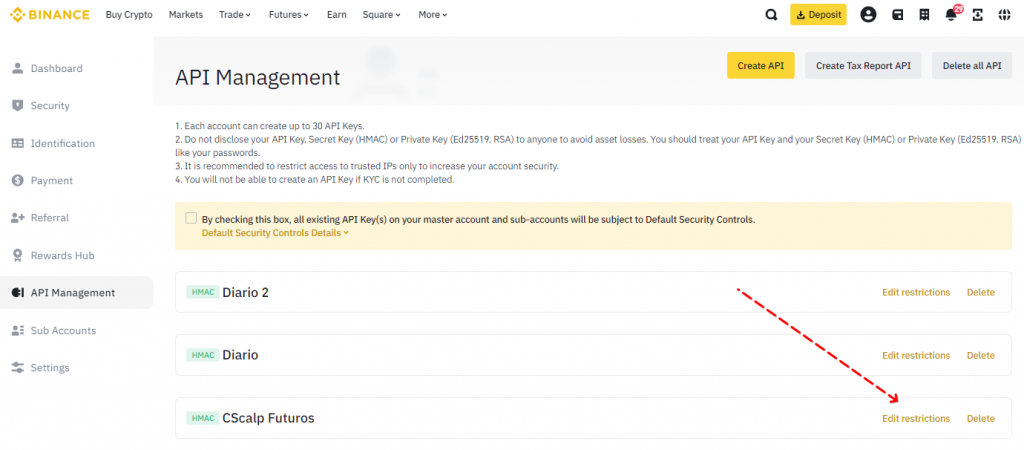
Edit Binance Futures API Keys Restrictions
When setting trading permissions, you will encounter two options: with IP binding and without binding. To set trading permissions without IP binding, you need to uncheck the security control elements activation checkbox.
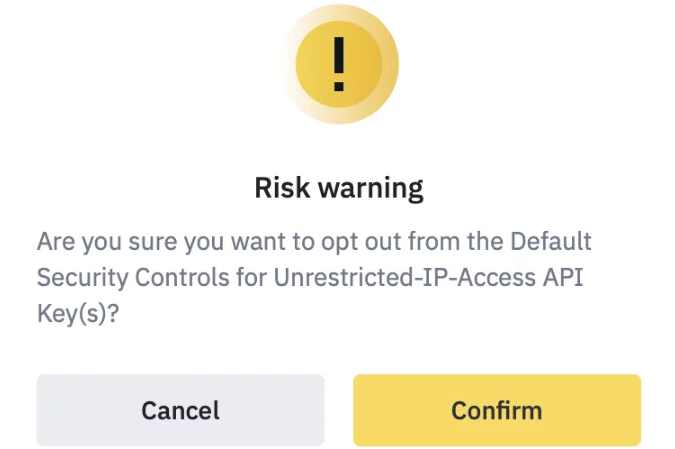
A window will appear to confirm your choice. Mark the checkbox and click “Confirm.”
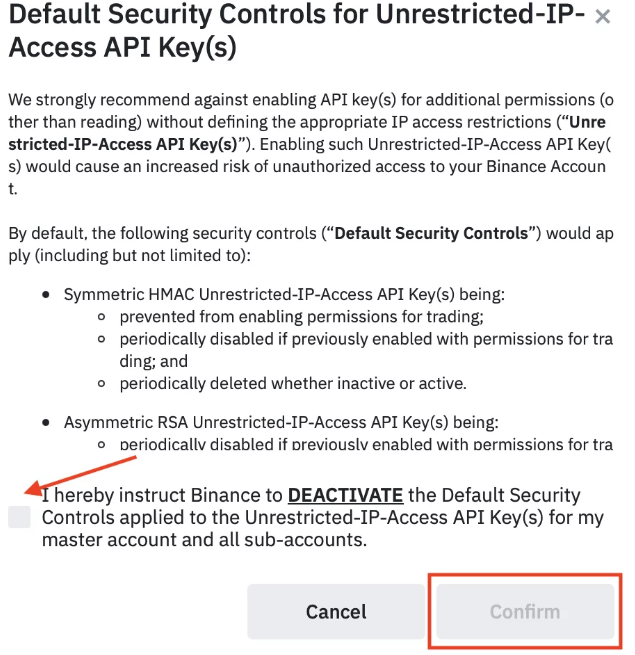
After that, click “Confirm” again in the “Risk Warning” window.
How to Enable Trading Permission of the Binance Futures API Key?
To trade futures, you need to enable a parameter of your Binance Futures API Key on the exchange’s website called “Enable Futures.” You can activate it from your account in the API Management section. Click “Edit restrictions” next to the Binance Futures API key you want to modify.
Add a parameter to the key that is responsible for trading on Binance. To achieve that, check the “Enable Spot & Margin Trading” box, as well as “Enable Futures” and click “Save”.
Don’t forget to fund your USDS-M futures wallet for trading. You can transfer funds to your Binance Futures wallet from the Fiat and Spot Wallet or the Deposit Wallet.
Congratulations, you have created the Binance Futures API Key and API Secret. Now let’s move on to connecting the CScalp professional trading terminal to the crypto exchange.
Connect CScalp to Binance Futures
Step 1: Launch CScalp
Start the CScalp professional trading software. Click the “Settings” button and navigate to the “Connections” tab. Select the “Binance: USDT Futures” option.
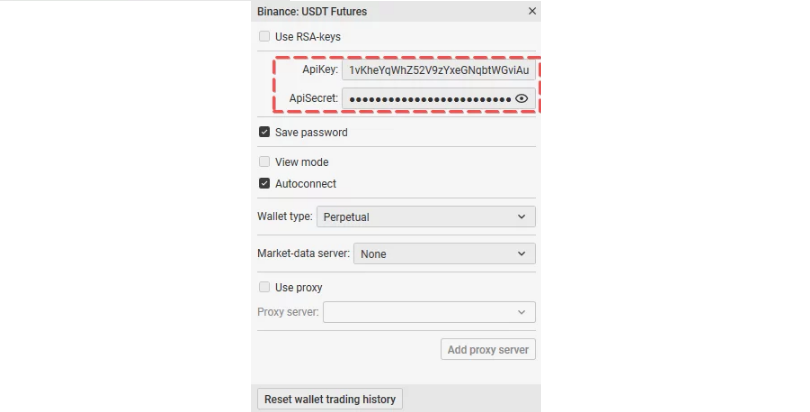
Step 2: Input Binance Futures API Credentials
In the “Binance: USDT Futures” settings window, you will find fields to input your “API Key” and “Secret Key.” These Binance Futures API keys act as a bridge between CScalp and Binance, ensuring secure data exchange. Input these details accurately, as any discrepancies can lead to connection issues.
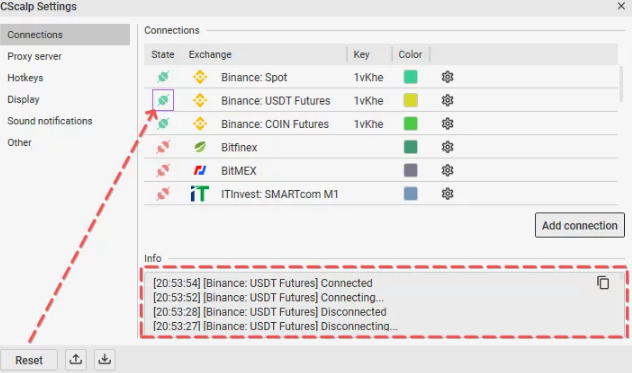
Step 3: Activate the Binance Connection
Once all the details are in place, it’s time to establish the connection. Look for the connection icon close to “Binance: USDT Futures” and click on it. If all the provided details are correct and the connection is successful, the connection icon will turn green. This color change is a visual confirmation that you are now connected to Binance and ready to start trading.
To learn about how to connect Binance Spot to CScalp, read our article: Binance API Example: Connect Binance to the Trading Terminal
Tips to Achieve a Smooth Connection
- Always note down your Binance Futures API “Secret Key” when you first receive it. It’s essential for connecting to Binance Futures.
- Ensure you’ve completed the necessary identity verification on the exchange’s website before creating Binance Futures API keys.
- The “Enable Futures” parameter on Binance is active for 90 days if no trusted IP address is specified. After this period, you’ll need to enable the parameter again.
Binance Futures API and CScalp – A Powerful Combination
Integrating Binance Futures with the CScalp trading terminal offers a streamlined and enhanced trading experience. By following the detailed steps provided, you can ensure a secure and efficient connection between the two platforms. As you embark on this journey, remember the importance of safeguarding your Binance Futures API keys and being vigilant in their management. The combination of CScalp’s advanced features and Binance’s vast market offerings promises a robust trading environment.
To further enrich your trading experience, we invite you to join our Discord server. Your insights, questions, and discussions will be a valuable addition to our growing community of traders.
Related article: How to set up Python-Binance API connection
Join the CScalp Trading Community
Join our official trader's chat. Here you can communicate with other scalpers, find trading soulmates and discuss the market. We also have an exclusive chat for crypto traders!
Don't forget to subscribe to our official CScalp news channel, use trading signals and get to know our bot.
If you have any questions, just contact our platform's support via Telegram at @CScalp_support_bot. We will respond in a matter of seconds.
You can also visit our Discord channel and subscribe to the CScalp TV YouTube channel.
JOIN OUR CHAT